
Follow up with Dr Jang checkpoints:
- 2 week wound check (remain in sling at all times).
- 6 weeks to come out of sling and start active range of motion exercises (see your physiotherapist at this stage).
- 12 weeks to commence strengthening.
- 6 months to progress with rehabilitation and gradual return to normal activities
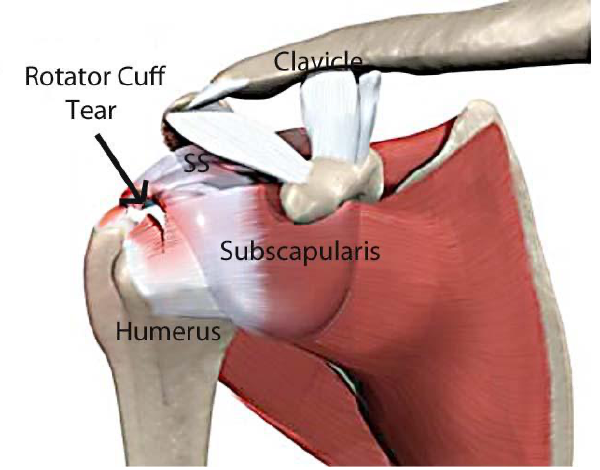
Understanding Your Injury
Pathology. The rotator cuff is a group of four muscles and tendons (supraspinatus, infraspinatus, teres minor and subscapularis) that surround the shoulder joint, holding the head of the humerus in the socket and powering rotation and elevation. A tear is a partial or complete disruption of one or more of these tendons, most often the supraspinatus.
Types. Tears are described in two ways. By depth: partial-thickness tears (involving only part of the tendon’s thickness) versus full-thickness tears (a complete hole through the tendon), which are further graded by size — small (under 1cm), medium (1-3cm), large (3-5cm) or massive (over 5cm, or involving two or more tendons). By cause: degenerative tears develop gradually from wear with age and are more common from the 40s onward, while traumatic tears follow a specific injury such as a fall or a heavy, sudden load on the arm.
Natural history. Degenerative tears are common and not all cause symptoms — many are found incidentally on imaging done for another reason. Left alone, however, tears tend to enlarge rather than heal: studies following patients over time found roughly half of previously symptom-free tears became painful within about 3 years, and full-thickness tears enlarged in around half of patients over a similar period. Long-standing, large tears can eventually lead to rotator cuff arthropathy, a pattern of arthritis specific to a chronically cuff-deficient shoulder.
Non-operative management. Appropriate for smaller or asymptomatic tears, lower-demand patients, or where surgical risk is higher. This centres on physiotherapy to strengthen the remaining cuff and surrounding muscles, activity modification, and corticosteroid injection for pain relief.
Operative management. Arthroscopic repair reattaches the torn tendon to the bone with suture anchors, and is generally recommended for symptomatic full-thickness tears in suitable patients, particularly if the tear is enlarging or strength is affected. Associated procedures — biceps tenotomy or tenodesis, ACJ excision, subacromial decompression — are added when the findings at surgery call for them. Very large or long-standing tears that can’t be fully repaired may need alternative options such as partial repair, superior capsular reconstruction or, in the setting of established cuff arthropathy, reverse shoulder replacement.
Reference: Mall NA, Kim HM, Keener JD, et al. Symptomatic progression of asymptomatic rotator cuff tears: a prospective study of clinical and sonographic variables. J Bone Joint Surg Am. 2010;92(16):2623-2633.
How much pain will I have?
Your nerve block will generally keep the shoulder numb and control the pain for 16 to 24 hours after the operation. It does feel a little weird not being able to feel or move your fingers, however the pain control is excellent when a nerve block works and hence it is recommended. As the block starts to wear off, you will notice some pain starting in the shoulder and some feeling and movement in your fingers. The nursing staff will be giving you pain medicine even if you don’t have pain, to make sure that it is working in your body before the nerve block wears off, otherwise the pain can be quite bad. The first 6 hours after the nerve block wears off is generally the most painful period, and then the pain eases and is usually manageable with the pain tablets. You are not to leave hospital until the nerve block has completely worn off, and you agree that the pain is manageable with the tablets. If you need an extra day or two in hospital to manage the pain, this is much better than suffering at home with uncontrollable pain.
For the first 2-3 days, it is important to try to stay in control of your pain by taking the pain killers regularly. After 2-3 days, you should keep taking the more gentle pain tablets (paracetamol, voltaren) and only take the stronger tablets (Endone, Tramal, or Oxycodone) if the gentle tablets weren’t enough. You will be provided with a prescription for these medications. If you need a repeat prescription, please feel free to contact my office or your local GP.
How much swelling and bruising will there be?
Following shoulder arthroscopy there will be a significant amount of swelling in the shoulder. This is mostly due to the arthroscopy fluid which is used to expand the joint and help visualization. It is not uncommon for the swelling and bruising to travel down the arm into the forearm and hand and also into the chest. To help with the swelling after surgery you should perform the hand and elbow exercises listed on the following sheet. If you feel you have an extraordinary amount of swelling or bruising following surgery, please contact me as listed above.
How much drainage and bleeding will there be and when can I change the dressing?
Fluid is pumped into the shoulder to aid visualization during surgery. This fluid causes the shoulder to swell and it is normal for this fluid and some blood to ooze out of the wounds after the surgery. A bulky dressing may be applied over the smaller dressings. This dressing often becomes soaked with fluid and or blood. It may be removed after 24 hours. Underneath this bulky dressing are smaller “stick on” dressings. They should be changed if they are soaked through, but may otherwise be left in place. Most wounds should be dry by 5 days after surgery. If your wounds are still draining thick blood or thick yellow fluid, then you should contact me on the numbers listed.
When can I take a bath or shower?
You should not soak the wounds in a bath or swimming pool for 3 weeks. You may shower or sponge bath after surgery. The dressings are “waterproof” but try to avoid soaking them with water in the shower. If they do get soaked, allow the dressings to dry and then change the dressings. You may take the sling off when in the shower and let the arm hang by your side. During the 6 weeks in a sling, it is important to keep the armpit clean and dry. When cleaning the armpit, don’t lift the arm with the muscles of the shoulder- you may damage the repair. Instead, lean forward by bending at the waist and allow the operated arm to gently dangle away from the body. You can then sponge and dry the armpit.
How often do I need to wear the sling?
You will wear the sling for 6 weeks. You should wear the sling all the time, especially when you are sleeping. You may remove the sling when you are showering or doing your exercises, or when you are watching television, but awake and able to care for the arm. You can take off the sling to get dressed- keep the operated arm by your side, and put that arm through the sleeve first, then your head, and then the other arm.
Can I use my arm to eat or write?
You can gently use your operated arm to eat. It is easiest to slip your arm out of the sling and use your hand to feed yourself by bending at the elbow. Keep your elbow at your side and do not reach or do anything away from your body or lift anything heavy (no more than a coffee cup). Similarly, you can write or type by keeping the elbow at your side.
How can I get comfortable to sleep?
It is least painful to sleep in a reclining chair or propped up with pillows in bed. When you are getting in and out of a bed or chair, DO NOT use your operated arm to push down. You should not sleep on the operated side for 6 months. It may help to place a small pillow behind the elbow or shoulder to help support the weight of the shoulder. If you sleep on your side (the operated side up) then it may help to place a pillow between your arms.
When should I return to work?
This depends on the type of work you do, how much pain you are in, and what type of surgery you have had. In general, most patients do not work until they are seen back in the rooms or clinic at 10 to 14 days after surgery. After this, most patients are able to tolerate either single-handed work (i.e. answering the phone) or light deskwork duties only.
When can I drive?
You can try driving short distances once you are off all of the strong (narcotic) pain medication. If you would like to try driving a power steering automatic (no manuals) then first take off your sling and get into the car. During the process of driving, you still need to keep movement of the operated arm to a minimum. See if you can manage the indicator, steering wheel etc., and if you feel you can, then try driving around the block once to make sure you will be able to manage the car. If you feel capable, then you can start driving short distances for convenience (up to 30 minutes per trip, 2-3 times per day). Avoid driving too much as you will find it too painful. If you don’t feel capable driving, then you can try again a few weeks later.
Who should I contact if I think I have a problem?
You should contact Dr Jang through his office during work hours or through the hospital where you had your surgery after hours. Less urgent questions can be emailed to admin@DrBobJang.com.au.
STAGE 1 EXERCISES AFTER ROTATOR CUFF SURGERY (Weeks 0 to 6)
There are NO SHOULDER EXERCISES in the first 6 weeks.
Hand Exercises
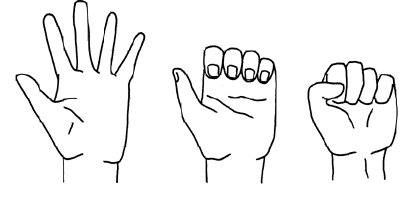
Open and close your hand by making a fist then straightening out your fingers. Keep this “hand pumping” exercise going as much and as often as you can- it helps to prevent swelling, and minimizes the chance of nerve problems and horrible chronic regional pain syndromes.
Elbow Exercises
With your arm in the sling all day, your elbow may begin to ache or you might get pins and needles in your fingers. You can minimize these symptoms by straightening out the elbow frequently during the day. You will need to release the sling to do this. Do not bend and straighten the elbow repetitively- just let it straighten out to ease the ache. Do not move the shoulder when doing this.
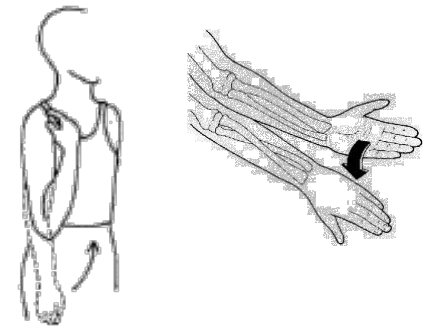
Forearm rotation: With your elbow at your side and bent at a right angle, turn palm up and palm down
STAGE 2 EXERCISES AFTER ROTATOR CUFF SURGERY (Weeks 6 to 12)
Referral to Physiotherapist
Please commence a gentle passive stretching program for this patient who is now 6 weeks after an arthroscopic rotator cuff repair. A light scapular program would also be of benefit. Please avoid pure abduction, and increasing pain. We will start a strengthening program at the 12 week mark. I am obviously happy for you to modify the program below depending on the progress of the patient.
Stage 2 of your rehabilitation commences 6 weeks after surgery and continues for at least 6 weeks. During this stage the aim is to gradually restore the range of motion to your shoulder. NO STRENGTHENING exercises are commenced as yet, these will most likely begin at the 12 week mark, depending on your progress.
It would be very helpful to have the supervision of a physiotherapist during your rehabilitation, however you must also continue these exercises on your own four times a day and you should spend 20 minutes on the exercises at each session.
Understandably your shoulder will be very stiff when you first start these exercises. Take each exercise as far as you can comfortably without pain and try to make small gains each day. Do not “push through the pain”. Pushing yourself too hard can actually slow your recovery due to a rebound in the pain and stiffness.
If you need pain medication, it should be taken about 30 minutes before you start the exercise. You may find it helps to warm up first with a hot shower, heating pad or hot water bottle before you exercise.
PENDULAR EXERCISES
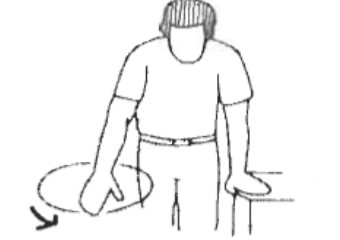
While bending at the waist, let the operated arm relax and swing with gravity. With the hand turned inwards, circle the arm in a clockwise direction, making the circles bigger and bigger. Perform these for 60 seconds. Then with the hand turned outwards, circle the arm in an anticlockwise direction, making the circles bigger and bigger for another 60 seconds.
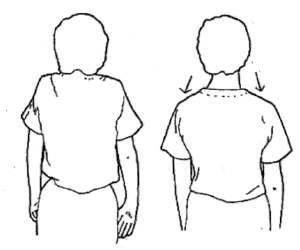
SHOULDER SHRUGS
With your arms relaxed by your side, shrug your shoulders upwards and then backwards in a circular fashion. You should perform 3 sets of 10 repetitions of this movement with a 30 second rest in between. Try to keep the other shoulder muscles relaxed.
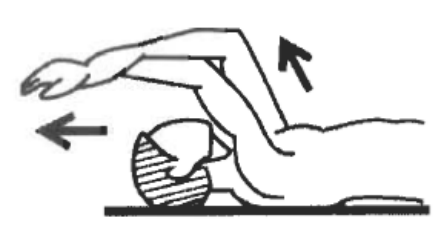
FORWARD ELEVATION
Lying on your back, clasp the operated arm’s wrist and use the good arm to pull both arms up over the head. Pull the arm as far back as you COMFORTABLY can manage and hold the arm there for 30 seconds. Repeat 10 times.
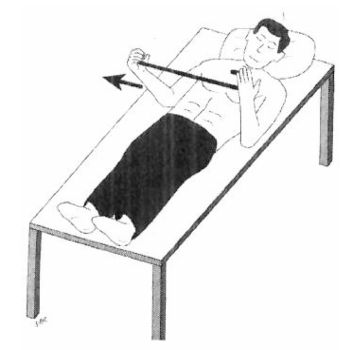
EXTERNAL ROTATION
With both elbows by your side and your arms bent at 90 degrees, hold a stick (e.g. cane, cut-off broom stick) between your hands. By using the good arm, gently push the operated arm outward from your body using the stick. Keep your elbow against the side of your body. When you feel the shoulder stretching out, hold this position for 30 seconds and then relax, and then repeat the exercise. It is easiest to perform this exercise lying down. As you feel more comfortable you can perform this exercise standing.
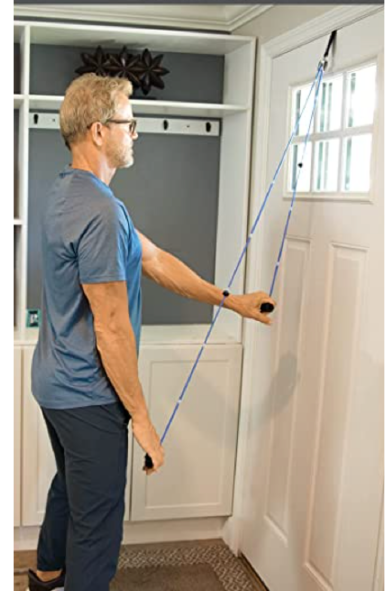
PULLEY EXERCISES
A Donovan Shoulder pulley may be purchased online such as from Amazon.com.au.
Stand or sit with the pulley firmly secured two feet higher than the good arm can reach overhead. You can either face the pulley or have your back towards it. Start with the operated arm down low and the other arm above. Pull down with the other arm which via the rope and pulley will lift the operated arm as far as is COMFORTABLE. Hold for 5 seconds and repeat 10 times.
Further guidelines for use of the arm during the 6 to 12 week period:
- Carrying Restriction: 2kg
- Avoid Overhead Activities
- Avoid “abduction exercises”, which involve bringing the arm directly out from the side (like a “star jump”). This is a painful and non-functional exercise, which should be avoided.
If you have any concerns during your rehabilitation, please do not hesitate to contact my office, or send me an email: admin@DrBobJang.com.au
POSTERIOR CAPSULAR STRETCHES
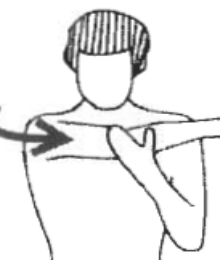
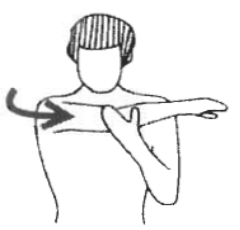
Reach across your chest towards the back of your neck with the operated arm. Grasp the elbow of the operated arm with the hand of the other arm and pull the elbow of the operated arm across the body and flat against the chest. Hold for 10 seconds and repeat 10 times.
STAGE 3 EXERCISES AFTER ROTATOR CUFF SURGERY (Weeks 12 onwards)
Referral to Physiotherapist
Please continue the stretching and introduce a strengthening program for this patient who is now 12 weeks after a rotator cuff repair. A more advanced scapular program would also be of benefit. I am obviously happy for you to modify the program below depending on the progress of the patient.
It is now time to introduce a strengthening program while continuing the stretching and shoulder blade exercises. It will help to have a physiotherapist or exercise physiologist to supervise your rehab. You should see the therapist once or twice each week and do the exercises 3 to 4 times per day, with the whole set of exercises taking 30 to 40 minutes.
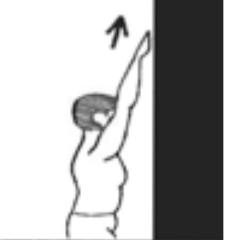
Forward elevation: Standing one foot from the wall, walk the hand up the wall as high as possible. Lean gently into the wall. Hold for 10 seconds and repeat 10 times. This is a good exercise to do in the shower with warm water running over the shoulder.
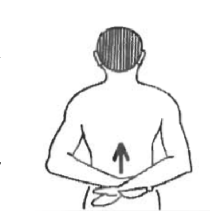
Internal rotation: Whilst standing, grasp the wrist of the operated arm with the hand of the other arm, and gently lift the operated arm towards the small of the back by bending the elbows. Hold for 10 seconds and repeat 10 times.
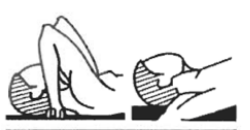
External rotation: Commence this exercise at week 16 after surgery. Lying on your back with your hands clasped behind your neck, gently flatten your arms out to the side to try and touch the bed. Push only as far as is comfortable. Hold for 10 seconds and then relax for 5 seconds. Repeat 10 times.
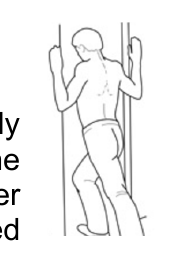
External rotation: Standing in a narrow open doorway, elbows bent and hands on the frame. Lean forward through the doorway stretching the arms backwards and outwards. Hold for 10 seconds and repeat 10 times.
Pulley exercises: Continue the pulley exercises. Stand or sit with the pulley firmly secured two feet higher than the good arm can reach overhead. You can either face the pulley or have your back towards it. Start with the operated arm down low and the other arm above. Pull down with the other arm which via the rope and pulley will lift the operated arm as far as is comfortable. Hold for 5 seconds and repeat 10 times.
Cross body stretch: Perform this exercise very gently and do not force the exercise as this may damage the operation. Reach across your chest towards the back of your neck with the operated arm. Grasp the elbow of the operated arm with the hand of the other arm and pull the elbow of the operated arm gently across the body. Hold for 10 seconds and repeat 10 times.
STRENGTHENING EXERCISES
These are to be done with theraband ribbons. The different colours have different grades of stretch. Start with the easy one and work your way up. The following is just a guide. You can progress to a harder band earlier if you feel you are ready.
| Resistance | Theraband Colour | Duration |
|---|---|---|
| Light | Yellow | 1 month |
| Medium | Red | 1 month |
| Heavy | Green | 1 month |
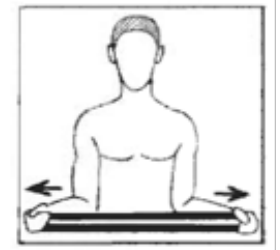
EXTERNAL ROTATION: With the theraband around both wrists and the elbows flexed to 90 degrees, rotate the arms outwards stretching the theraband. Keep the elbows CLOSE to the body. Hold for 10 seconds and repeat 10 times.
FORWARD ELEVATION: With the theraband around the door knob and the elbow bent to 90 degrees, push forwards and upwards to stretch the theraband. Hold for 10 seconds and repeat 10 times. Keep the elbow bent with this exercise.
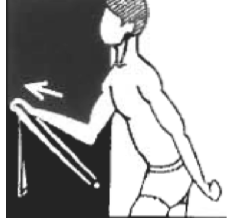
INTERNAL ROTATION: With the theraband around the doorknob and the elbow flexed to 90 degrees, pull the theraband across the chest whilst keeping the elbow tucked into the side. Hold for 10 seconds and repeat 10 times.
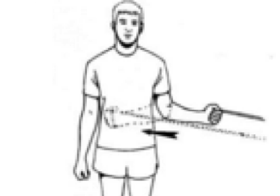
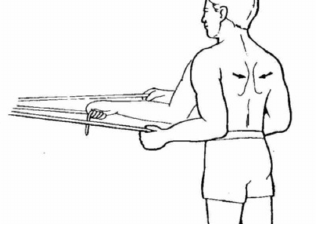
EXTENSION AND SHOULDER BLADE SQUEEZE: With the theraband around the doorknob, the elbow flexed to 90 degrees and the elbow by your side, pull backwards to make the theraband stretch out and then squeeze your shoulder blades towards one another. Hold this squeeze for 5 seconds and repeat 10 times.
FURTHER GUIDELINES for use of the operated arm for weeks 12 – 24.
Carrying restriction: Increase to 5kg at 3 months post operatively and increase by 1kg each week
Avoid repetitive overhead activities
Avoid abduction exercises which involve bringing the arm directly out from the side (like a star jump). This movement is painful and non-functional, which should be avoided.